Why Do I Always Have to Turn Off Printer and Turn on Again Before I Print?
Problem Solver
Troubleshooting
Printer stops printing unexpectedly
Printer stops printing unexpectedly
Caput cleaning, ink charging, or ink drying is in progress
Check to encounter if the Pause light is flashing. If and then, the printer is in the procedure of head cleaning, ink charging or ink drying. During head cleaning, ink charging, and ink drying, Delight Await appears on the LCD. Wait until the printer resumes printing.
An fault has occurred
Many common printer problems tin be identified past the messages on the LCD.
You lot can besides cheque the lights on the control panel for errors. See Lights.
For other messages not included in the following tabular array, see Messages.
Error messages
| Message | Description | What to do |
| UNABLE TO PRINT | An error may be occurring when yous try to print patterns such equally nozzle check or head alignment. | Cease the TEST PRINT MENU first, and solve the fault displayed on the LCD. Then try to print patterns again. |
| MNT TK NEAR Total | The maintenance tank is well-nigh full. | Supervene upon the maintenance tank with a new ane. Come across Replacing the Maintenance Tank. |
| INK LOW | Ink cartridge is nearly empty. | Replacement of ink cartridge is near needed. |
| MNT REQ nnnn | A part used in the printer has nearly reached the end of its life. "nnnn" shows the code of the part. | Notation the code and contact your dealer. See Contacting Customer Support. |
| REMOVE PAPER | Cleaning cannot be executed because thick paper is loaded. | Remove the thick paper, and motion the paper lever to the secured position. |
| The printer could not feed the printout. | Remove the printout. | |
| NOZZLES STILL Chock-full | The nozzles are notwithstanding clogged. | Run the Head Cleaning utility. For Windows, see Cleaning the print head. For Mac Os X, see Cleaning the print head. |
| Modify Paper TYPE | The loaded paper does non match the paper type selected. | Match the loaded paper to the paper type. See Buttons. |
| WRONG PAPER SIZE | The loaded newspaper size does not match the data size. | Match the loaded paper size to the data size. |
| Newspaper OUT | No paper is loaded in the printer. | Load paper correctly. |
| Roll paper is out while press is in progress. | Load a new roll paper. | |
| NO BORDERLESS WITH THIS SIZE RELOAD Newspaper Note: | A2 size cut sheet media has been installed for borderless press. | Install a unlike size of cutting sail media or roll newspaper. Run into Making the Borderless setting for Windows or Performing Borderless Press for Mac Os X. |
| RELOAD PAPER | The printer cannot detect the loaded cutting sheet media, considering it is wavy or curled. | Flatten the cut sheet media. |
| The printer cannot detect the loaded newspaper. | Motion the paper lever. | |
| RELOAD Newspaper INSERT DEEPLY | Cut sheet media inserted from the front manual feed slot is not inserted deep enough. | Insert the paper deeper. See Loading paper into the front transmission feed slot. |
| Not STRAIGHT RELOAD | Cutting canvas media is not loaded straight, and needs to be aligned. | Load the cutting canvass media correctly. Run across Loading cutting-canvass media. |
| PAPER Non Straight | The paper is non loaded straight. | Load newspaper straight. |
| Newspaper Not Cutting | Paper is not cutting correctly when Roll Auto Cut On | Open up the height comprehend and remove the uncut paper. If RELOAD Newspaper appears on the LCD, reload paper. |
| The paper cutter may not be installed correctly. Encounter Replacing the Paper Cutter. | ||
| Paper cutter may be blunt. Replace the paper cutter. See Replacing the Paper Cutter. | ||
| Control Fault | Damaged data is sent to the printer. | Stop printing, and printing the Pause button for 3 seconds. |
| The printer receives data with a wrong control. | ||
| The installed printer commuter is not correct for the printer. | Stop printing, and press the Pause button for 3 seconds. Then make certain that the installed printer commuter is correct for the printer. | |
| Commuter INK SET SETTING IS Wrong MISMATCH ERROR Notation: | The cartridge option of the printer commuter has non been changed yet. | Finish press, and then press and concur the Interruption push for three seconds. Finally, select the correct ink cartridge in the printer driver according to the actual ink cartridge attack the printer. Run across Updating the printer driver information. If you desire to proceed printing, printing the Pause button. |
| Not-Epson 18-carat ink cartridge is installed. | Printing the Pause button for 3 seconds to cancel printing. If you lot want to go along printing, press the Intermission push button. | |
| LOAD Gyre Paper | The roll paper is not set up correctly. | Load the roll paper correctly, and select |
| LOAD Canvass Paper IN P. TRAY | The cutting sheet media is non set up correctly in the paper tray. | Set the cut sheet media in the paper tray correctly, and select |
| FEED SHEET PAPER | The cut sheet media needs to be loaded manually. | Load the cut sail media. |
| FORBIDDEN MEDIA FROM P. TRAY | Cut canvas media, which is to exist loaded from the front or rear transmission feed slot, is existence loaded from the paper tray. | Remove the cut sheet media from the paper tray, and load it from the proper paper feed slot. See Checking the paper path. |
| FEED SHEET PAPER MANUALLY | The cutting canvas media needs to be loaded manually. | Load the cutting canvass media manually from the front or rear transmission feed slot. Meet Checking the newspaper path. |
| TIMES REMAINING | The conversion cartridge needs to be replaced presently. (The remaining times of the conversion cartridge appears on the LCD.) | Replacement of conversion cartridge is nigh needed. Press the Interruption button. |
| Supersede CNVRSION CRTG | The conversion cartridge needs to exist replaced. | Supersede the conversion cartridge with a new one. Or, complete the replacement of the K ink past pressing the Break button. |
| INK OUT | Ink cartridge is empty. | Supersede the empty ink cartridge with a new one. Meet Replacing Ink Cartridges. |
| INVALID INK CRTG | Ink cartridge with the wrong product lawmaking is installed. | Remove the ink cartridge, and install the ink cartridge with the correct product code. See Consumable Products. |
| WRONG INK CRTG | Ink cartridge that cannot exist used with this printer is installed. | Remove the ink cartridge, and install the ink cartridge that can be used with this printer. See Consumable Products. |
| Set INK CRTG | CSIC error has occurred. | Remove the ink cartridge and reinstall it. If this message appears afterwards reinstalling the ink cartridge, replace it. Run across Replacing Ink Cartridges. |
| NO INK CRTG | Ink cartridge is not installed, or ink lever is raised to the released position. | Install ink cartridge, or lower the ink lever to the secured position. |
| MNT TNK FULL | The maintenance tank is full. | Replace the maintenance tank with a new one. See Replacing the Maintenance Tank. |
| LOWER INK LEVERS | Both ink levers have been raised. | Lower the ink levers. |
| LOWER L INK LVR | The ink lever on the left ink compartment has been raised. | Lower the ink lever on the left ink compartment. |
| LOWER R INK LVR | The ink lever on the right ink compartment has been raised. | Lower the ink lever on the right ink compartment. |
| Height COVER OPEN | Top cover is open. | Close the acme cover. |
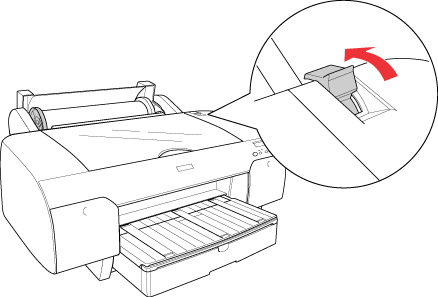
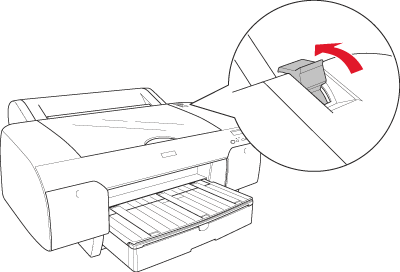
| LOAD PAPER | The newspaper lever is in the released position. | Movement the paper lever to the secured position. |
| Prepare PAPER LEVER | Paper lever is in the released position. | Move the paper lever to the secured position. |
| RELEASE LEVER | Paper is jammed in the printer. | Release the paper lever offset. Then, open up the top embrace if necessary and remove the jammed newspaper. If Turn PRINTER PWR OFF Then ON appears on the LCD, turn the printer off, leave it for a while, and then turn it on once again. See Clearing newspaper jams. |
| NO MNT TNK | The maintenance tank is not prepare in the printer. | Install the maintenance tank. |
| REAR Cover OPEN | The rear cover is open. | Shut the rear cover. |
| UPDATE FAILED | The printer failed to update the FirmWare. | Update the FirmWare again. |
| Pick I/F Error | The installed interface cannot exist used with this printer. | Remove the interface card, and install the interface menu that can be used with this printer. See Options. |
| UNLOCK Impress HEAD | Print caput is locked. | Pull the green tab on the left side of the impress caput to release the print caput. |
| SERVICE REQ nnnnnnnn | Print head is locked. | Pull the green tab on the left side of the print head to release the impress caput. |
| A fatal mistake has occurred. | Plow the printer off, leave it for a while, and turn the printer on again. If this bulletin appears on the LCD again, note the code and contact your dealer. See Contacting Customer Support. |
 is selected.
  . See Loading curl newspaper.
  . See Loading cut-sheet media.
 ![]()
[Top]
The printer does not plow on or stay on
When the Pause calorie-free does not come on and mechanism initialization does not start even when the Power  push is pressed to turn on the printer, try the following solutions for the problem.
- Plow off the printer and brand sure the power string is securely plugged into the printer.
- Make sure your outlet works and is not controlled by a wall switch or timer.
- Make sure the supplied voltage to the printer matches the rating voltage labeled on the printer. If not, turn off the printer and unplug the power cord immediately. Contact your dealer for assist. See Contacting Client Support.
| | Caution: |
| | If the supplied voltage and rating voltage exercise non match, do not plug the printer back in once again, as harm may occur. |
![]()
[Top]
The printer prints nothing
The printer is non correctly connected to the computer
Endeavor one or more of these solutions:
- Turn off the printer and computer. Make sure the printer's interface cablevision is deeply plugged into the correct terminal of the figurer.
- Make sure the interface cable specifications lucifer the specifications for the printer and computer.
- Make certain the interface cable is directly connected to the computer without passing through any device, such as a printer switching device, or extension cable.
Your Epson printer is not selected as the default printer
Install the printer driver if it is not installed nonetheless, and follow the steps below to select your Epson printer as the default printer.
For Windows XP
 | Click the Start button, and Printer and Faxes. |
 | Right-click EPSON Stylus Pro 4800. |
 | Select Set Equally Default Printer, then close the window. |
For Windows 2000
| | Click the Start button, point to Settings and select Printers. |
| | Right-click EPSON Stylus Pro 4800 in the Printers window. |
| | Select Fix Every bit Default, and so shut the Printers window. |
For Mac OS X
Brand sure that the printer driver Stylus Pro 4800 is correctly added to the Printer Setup Utility (for Mac Os 10 10.iii), and the correct one is selected in the Printer Setup Utility.
Printer port setting does not lucifer the printer connection port (for Windows only)
To select the printer port, follow the steps below.
For Windows XP
| | Click Start, click Command Panel, click Printers and Other Hardware, and so click Printers and Faxes. |
| | Right-click EPSON Stylus Pro 4800, then select Properties. |
| | Click the Ports tab. |
 | Brand sure that your printer port is selected. |
For Windows 2000
| | Click Start, point to Settings, then select Printers. |
| | Right-click EPSON Stylus Pro 4800 in the Printers window, then select Properties. |
| | Click the Ports tab. |
| | Brand sure that your printer port is selected. |
Effort one or more of these solutions:
- Run the Head Cleaning utility. For Windows, see Cleaning the print head. For Mac Bone 10, see Cleaning the print head.
- If the Head Cleaning utility does not work, replace the ink cartridges. See Replacing Ink Cartridges.
![]()
[Top]
Printouts are non what yous expected
Incorrect, garbled characters, or blank pages print
Try one or more of these solutions:
- For Windows, clear whatsoever stalled print jobs from the Progress Meter. Meet Using the EPSON Spool Manager.
- If the problem persists, turn off the printer and computer. Make sure the printer's interface cablevision is plugged in deeply.
Incorrect margins
Endeavour one or more of these solutions:
- Check the margin settings in your application.
- Make sure the margins are within the printable area of the page. See Printable surface area.
- For Windows, check the Borderless setting in the Paper menu. Make certain they are correct for the paper size you are using. See Making Settings on the Paper Menu.
- Make sure the paper set position is correct. Encounter Using Whorl Newspaper, or Using Cut Canvass Media.
Inverted image
For Windows, turn off the Flip Horizontal setting in the Advanced carte du jour. Encounter Making Advanced setting.
For Mac Os X, turn off the Flip Horizontal setting in the Advanced Settings selected in the Print Settings selected in the Print dialog. Come across Avant-garde Settings.
Printed colour differs from the color on the screen
Try one or more of these solutions:
- Adjust the Color Density in the Paper Configuration dialog. For Windows, see Paper Configuration. For Mac Os Ten, see Paper Configuration.
- Make sure the media type setting matches the paper being used.
- Since monitors and printers produce colors differently, printed colors will not always lucifer on screen colors perfectly. Nevertheless, the above color systems are provided to overcome color differences.
For Mac Bone X, select ColorSync to colour match your organization in the Printer Color Management selected in the Print dialog. See Printer Color Direction.
- You tin can produce sharper images with more brilliant colors.
For Windows, select PhotoEnhance in the Avant-garde carte. Run across Making Avant-garde setting.
- For Windows, select Color Controls in the Advanced menu, and suit colour, brightness, etc. as required. Encounter Making Advanced setting.
For Mac Os X, select Colour Controls in the Printer Color Management selected in the Print dialog. See Printer Color Management.
A ruled line shifts
Perform the impress head alignment. For Windows, see Aligning the print caput. For Mac Bone X, see Aligning the impress caput.
If the trouble persists, perform the print head cleaning. For Windows, see Cleaning the impress head. For Mac OS X, see Cleaning the print head.
Printout has smears on the bottom edge
Try one or more of these solutions:
- If the paper is curled towards the printable side, flatten it or curl information technology slightly to the opposite side.
- For Windows, if you use Epson special media, check the Media Type setting in the Main carte. See Making Settings on the Main Carte du jour.
For Mac OS X, if you lot employ Epson special media, check the Media Type setting in the Print Settings selected in the Impress dialog. Run across Folio Setup.
For newspaper other than Epson's, annals and select newspaper thickness in the SelecType mode. Make sure information technology is right for the paper you are using. See Making the newspaper settings.
- Set the PLATEN GAP to WIDE in the PRINTER SETTING of the SelecType way. See PRINTER SETUP.
![]()
[Summit]
Print Quality Could be Better
Click the caption nether the analogy that best resembles your printout.
If you are having print quality problems, try the solutions offered here.
Horizontal banding
Endeavour one or more of these solutions:
- For Windows, bank check the Media Type setting in the Main carte. Brand sure it is correct for the paper yous are using. Encounter Making Settings on the Main Menu.
For Mac Bone 10, check the Media Type setting in the Print Settings selected in the Impress dialog. Brand sure it is correct for the paper y'all are using, see Folio Setup.
- Brand sure the printable side of the newspaper is face-upwardly.
- Run the Head Cleaning utility to clear any clogged ink nozzles. For Windows, run into Cleaning the impress caput. For Mac OS X, come across Cleaning the impress head.
You can likewise clean the impress head nozzles using the control panel. To clean the print head nozzles, press the Bill of farepush button for 3 seconds.
- Check the Paper Feed value. Reduce the value to better light banding, and increase it for nighttime banding. For Windows, Newspaper Configuration. For Mac Os X, run across Paper Configuration.
- Check the Ink check light. If necessary, replace ink cartridges. Meet Replacing Ink Cartridges.
Vertical misalignment or banding
Attempt i or more than of these solutions:
- For Windows, turn off the High Speed setting in the Advanced bill of fare. See Making Avant-garde setting.
For Mac OS X, turn off the High Speed setting in the Advanced Settings is selected in the Print Settings selected in the Print dialog. Encounter Advanced Settings.
- Run the Print Head Alignment utility. For Windows, run across Adjustment the print head. For Mac Os 10, meet Adjustment the print head.
Faint printout or gaps
Endeavour ane or more of these solutions:
- Make sure that the ink cartridges practise not exceed the expiration date. The expiration date is labeled on the outside of the ink cartridge.
- For Windows, check the Media Type setting in the Chief bill of fare. Brand sure it is correct for the paper you lot are using. Encounter Making Settings on the Primary Bill of fare.
For Mac Os X, cheque the Media Type setting in the Print Settings selected in the Print dialog. Make sure it is right for the paper you are using. See Page Setup.
- Run the Caput Cleaning utility to clear whatever chock-full ink nozzles. For Windows, see Cleaning the print caput. For Mac Os Ten, see Cleaning the print head.
You tin can also clean the print head nozzles using the control panel. To clean the print caput nozzles, press the Menu
- Check the Ink check calorie-free. If necessary, replace ink cartridges. Encounter Replacing Ink Cartridges.
- Select Standard as Platen Gap in the Newspaper Configuration dialog box. For Windows, see Newspaper Configuration. For Mac Bone Ten, see Paper Configuration.
Blurry or smeared printout
Try one or more of these solutions:
- For Windows, check the Media Type setting in the Principal menu. Brand sure it is right for the paper you lot are using. Encounter Making Settings on the Master Carte du jour.
For Mac Os X, check the Media Type setting in the Print Settings selected in the Print dialog. Make sure it is correct for the paper you are using. See Page Setup.
- If the paper you lot are using is not supported by the printer commuter, brand the newspaper thickness setting in the SelecType style. Meet CUSTOM Paper.
- Make sure your paper is dry and the printable side is face-up. Also, make sure you are using the correct type of paper. See Paper for specifications.
- Ink may have leaked inside the printer; wipe the inside of the printer with a soft, clean cloth.
- Run the Head Cleaning utility. For Windows, see Cleaning the impress head. For Mac Bone 10, see Cleaning the print head.
You tin also make clean the print head nozzles using the control panel. To clean the print head nozzles, printing the Carte
![]()
[Top]
Color documents impress in blackness only
Endeavor one or more of these solutions:
- Brand sure the color information settings in your application are correct.
- For Windows, make sure Colour or Colour/B&W Photo is set in the Principal carte du jour. Run into Making Settings on the Chief Menu.
For Mac Bone X, make sure Color or Color/B&W Photograph is set in the Impress Settings selected in the Print dialog. See Color.
![]()
[Acme]
Press could be faster
Try i or more of these solutions:
- Select Loftier Speed on the Advanced dialog box. For Windows, run into Making Advanced setting. For Mac Bone Ten, see Advanced Settings.
- For Windows, select the Automated mode and move the slider towards Speed in the Primary card to increase print speed. Run across Making Settings on the Main Menu.
For Mac Bone X, select Automatic manner and move the slider towards Speed in the Print Settings selected in the Print dialog to increase impress speed. Run across Mode.
- Do not run likewise many applications at the same time. Close any applications yous are not using.
- Alter the interface card of your computer to IEEE1394 or USB two.0.
- Delete unnecessary files to brand room on your hard disk drive.
![]()
[Top]
Ringlet paper cannot be cutting
Try one or more of these solutions:
- Make sure that paper cutter comprehend is set correctly. See Replacing the Paper Cutter.
- Brand sure that Normal Cutting, Single Cut, or Double Cutting is selected as the Automobile Cutting in the printer driver. For Windows, see Making the Motorcar Cut setting. For Mac Os X, see Automobile Cut.
- Cut the scroll paper by mitt if necessary. Check that the newspaper thickness of the coil paper loaded in the printer matches the newspaper specification (see Paper). If so, the paper cutter may be blunt and require replacement. Run across Replacing the Paper Cutter.
![]()
[Top]
Paper feed or newspaper jam issues occur frequently
Attempt one or more of these solutions:
- Before loading newspaper and guiding information technology through the newspaper insertion slot, adjust paper suction.
To adjust the paper suction using the printer commuter, run across Paper Configuration for Windows or see Paper Configuration for Mac Bone Ten.
To accommodate the paper suction using the control console, see CUSTOM PAPER.
- Make certain the paper is not folded or wrinkled.
- Make sure the paper is flattened.
- Brand sure printing occurs within the operational temperature range.
- Make sure the paper is not damp.
- Make certain the paper is not too thick or besides thin. See Newspaper.
- Make sure no foreign objects are inside the printer.
- For Windows, check the Media Type setting in the Master card. Make certain it is right for the newspaper you are using. See Making Settings on the Main Bill of fare.
For Mac OS X, check the Media Type setting in the Impress Settings selected in the Print dialog. Make sure it is right for the paper yous are using. See Page Setup
- Make sure that the platen gap setting matches your paper. You can change the platen gap setting in the PRINTER SETUP of the SelecType mode. See PLATEN GAP.
- For non-Epson special media, check the paper type selected in the CUSTOM Paper of the SelecType mode. See Making the newspaper settings.
Whenever loading non-Epson special media, test if the paper tin be loaded correctly before printing.
To clear Newspaper jams, see Clearing paper jams.
![]()
[Top]
Roll paper does not eject properly
Try one ore more of these solutions:
- Roll paper is wound tightly and may feed with a coil. Flatten it before yous load it.
- Select Starwheel-Roll Curled as the Feed Roller Blazon in the Paper Configuration dialog box. For Windows, see Paper Configuration. For Mac OS Ten, run across Paper Configuration.
![]()
[Top]
Clearing paper jams
When gyre paper is jammed
To remove jammed roll newspaper, follow the steps below:
| | Plough off the printer. |
| | Open the whorl paper cover, and motility the paper lever to the released position. |
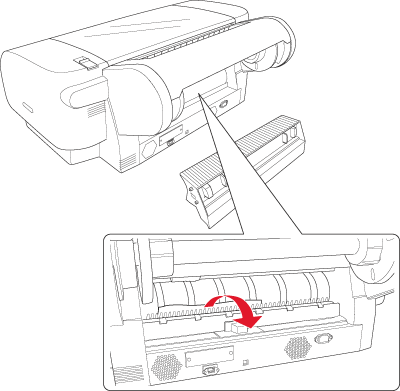
| | Cutting the paper at the paper insertion slot, and remove the roll newspaper. |

| | Remove the jammed paper from the front or rear side of the printer. |

If necessary, open the tiptop cover, and remove the jammed paper.


When paper loaded from the paper tray is jammed
To remove jammed paper, follow the steps below.
| | Plow off the printer. |
| | Motility the paper lever to the released position. |
| | Remove the paper tray from the printer. |

| | Carefully remove the jammed newspaper. |

If necessary, open the top cover, and remove the jammed paper.
If the paper is jammed around the rear cover, remove the rear cover by squeezing the knobs, and remove the jammed paper.

When paper loaded from the front transmission feed slot is jammed
To remove jammed paper, follow the steps below:
| | Plow off the printer. |
| | Move the paper lever to the released position. |
| | Remove the jammed paper from the forepart or rear side of the printer. |
When paper loaded from the rear transmission feed slot is jammed
To remove jammed paper, follow the steps beneath:
| | Plough off the printer. |
| | Movement the paper lever to released position. |
| | Remove the jammed paper from the forepart. If necessary, open the top cover and remove the jammed paper. |
![]()
[Top]
Contacting Client Support
If your Epson product is non operating properly and you cannot solve the trouble using the troubleshooting information in your product documentation, contact customer back up services for aid. If customer back up for your area is not listed below, contact the dealer where you purchased your product.
Client back up will be able to assistance you much more quickly if yous requite them the following information:
- Product serial number
(The serial number label is usually on the dorsum of the product.)
- Product model
- Product software version
(Click Nigh, Version Info, or like push in the product software.)
- Brand and model of your reckoner
- Your computer operating system name and version
- Names and versions of the software applications you lot normally use with your production
Where To Get Help
Epson provides technical support and information on the installation, configuration, and functioning of professional person press products through the Epson Preferred Protection Program. Dial (888) 377-6611, 6 AM to half dozen PM, Pacific Time, Monday through Friday. Support hours and days are subject to change without find.
Earlier you phone call, make certain yous take your Unit ID number, which is included with the Epson Preferred Protection Plan information that came with your printer. Yous'll also need your printer serial number and proof of buy.
Epson also provides technical aid 24 hours a twenty-four hours through the World Wide Web. Y'all can attain Epson Support at http://back up.epson.com. At this site, you tin download drivers, firmware, and other files, look at product documentation, admission troubleshooting information, and receive technical advice through eastward-mail.
You can purchase 18-carat Epson ink cartridges, paper, and accessories from an Epson reseller. To observe the nearest authorized reseller, please call 800-Go-EPSON (800-463-7766). To purchase online, visit www.epsonstore.com (U.S. sales just). In Canada, please call 800-463-7766 for a reseller referral.
![]()
[Top]
Version NPD1123-00, Copyright © 2005, SEIKO EPSON CORPORATION
Source: https://files.support.epson.com/htmldocs/pro48u/pro48urf/trble_1.htm
0 Response to "Why Do I Always Have to Turn Off Printer and Turn on Again Before I Print?"
Post a Comment